As an Amazon Associate, we earn from qualifying purchases. Some links may be affiliate links at no extra cost to you. Although our opinions are based on curated research, we haven't used these products. Articles generated with AI.

How To Fix Roman Shade Cords?
To fix Roman shade cords, we start by identifying common issues such as tangling or fraying. We’ll need cutting tools, replacement cords, and fastening materials. First, we’ll remove the old cords and measure the replacements to guarantee they fit correctly. After cutting the new cords, we can reinstall the shade and connect the cords to quick-release toggles for smooth operation. Finally, we test the shade and adjust the cord tension for peak performance. More detailed steps await.
Key Takeaways
- Inspect for uneven, frayed, or tangled cords, and remove any worn or damaged cords from the shade.
- Measure and cut replacement cords to the appropriate length, ensuring proper thickness for optimal support.
- Seal cord ends using heat sealing or fabric glue to prevent fraying and ensure durability.
- Reinstall the shade correctly, securing cords at the bottom slats and testing the operation for smooth movement.
- Adjust cord tension as needed to maintain effective functionality and conduct regular inspections for optimal performance.
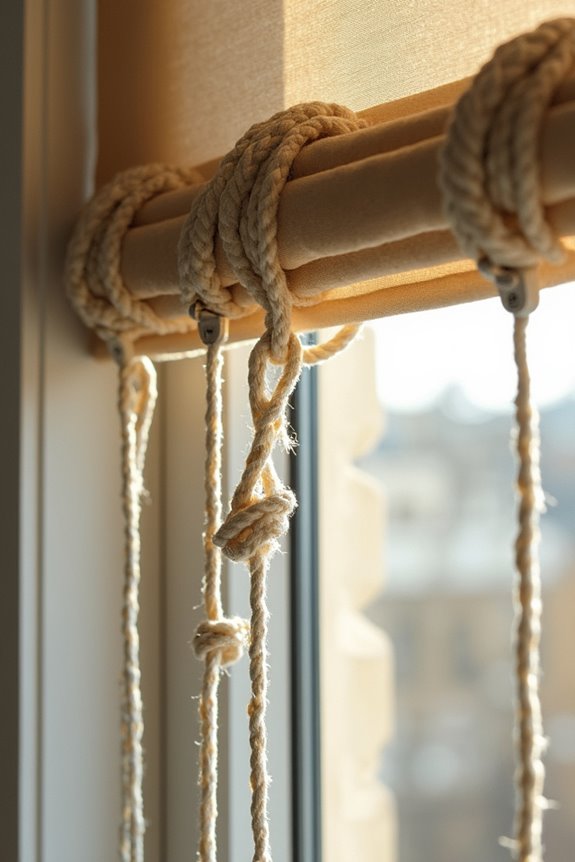
Identify the Common Issues With Roman Shade Cords
You may be interested


When dealing with Roman shade cords, we often encounter a few common issues that can affect their functionality. Recognizing these problems is essential for effective shade maintenance and cord safety.
- Uneven or Sagging Cords: This usually occurs when one cord is shorter or caught. Tightening cords often resolves sagging.
- Frayed or Broken Cords: These issues can arise due to sharp edges inside the shade. Frays can hinder the raising mechanism and may require complete cord replacement.
- Cord Lock Malfunctions: If the cord lock doesn’t function correctly, it can prevent shades from staying raised. This often involves jamming from tangled cords.
- Tangled Cords: Tangling can impair shade movement and pose a safety risk, especially around children and pets. Additionally, many modern shades feature cordless designs that eliminate these common issues entirely for enhanced safety and convenience.
Tools and Materials Required for Repair
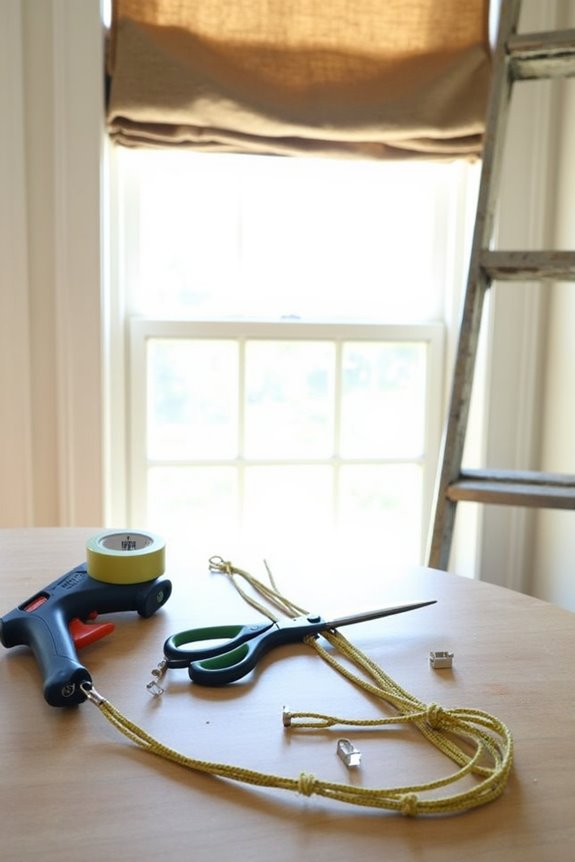
Having identified the common issues with Roman shade cords, we can now gather the tools and materials needed to perform effective repairs. Here’s a list of essential tools and materials to have on hand:
Essential Tools:
- Seam ripper or small sharp blade for precise cuts
- Scissors for cord and tape adjustments
- Staple gun or fabric glue for securing elements
- Needle and strong thread for sewing
- Measuring tape for accurate measurements
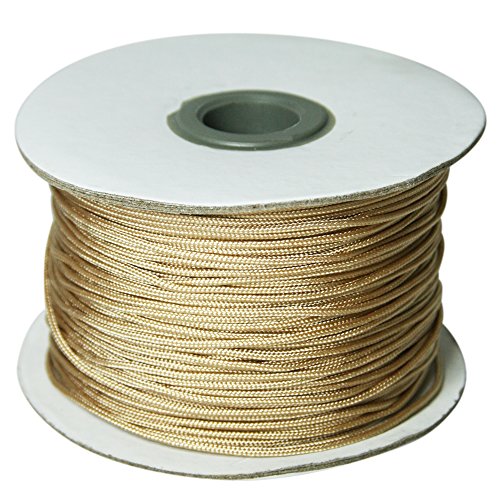
Cord Types:
- Polyester or nylon cords, typically 2.2mm in diameter
- Flat tape ribbons for structure support
- Sew-on rings for even cord distribution
Additionally, it’s important to ensure that the cords are made from high-quality materials to enhance durability and performance.
Recommended Products
1.8 Small diameter makes it inconspicuous. Cords are braided to minimize stretch and reduce friction

1.8 Small diameter makes it inconspicuous. Cords are braided to minimize stretch and reduce friction

Stainless Steel Material: Premium stainless steel material, rustproofdurable & great pulling force over 40 Pound. This pull chain with standard size and smooth surface, give you comfprtable feeling when you hold it
Steps to Remove Old Cords
Removing old cords from Roman shades is a straightforward process that we can tackle step-by-step. First, let’s make sure we practice safety precautions by working in a clean, flat space and gathering necessary tools, like scissors and pliers.
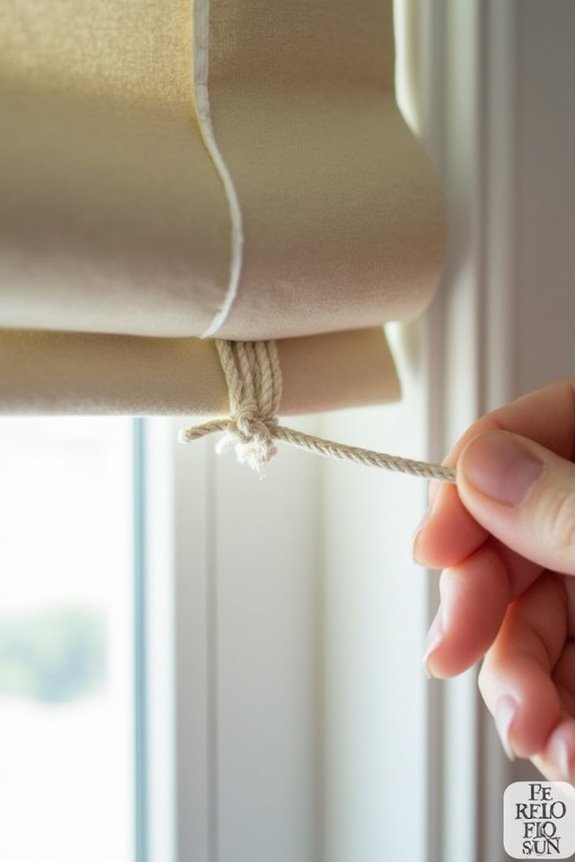
Next, we’ll detach the cords from the bottom rail by locating quick-release toggles or knots. It’s important to avoid common mistakes, such as rushing this step, as we don’t want to damage the fabric.
After that, we’ll carefully remove the shade from its headrail, pulling the cords downward through the channels. Finally, let’s take out the cord lock mechanism using a flathead screwdriver. Once all cords are removed, we should inspect them for wear and prepare for the next steps in replacement. Additionally, considering the material durability of the replacement cords will ensure long-lasting functionality and aesthetic appeal.
Recommended Products

Fill your home with the natural beauty and warmth of MOOD Cordless Bamboo Roman Shades. Top Down Bottom Up is only available in the following collections - Modern Wood, Rustic, Twirl (currently viewing).

Fill your home with the natural beauty and warmth of MOOD Cordless Bamboo Roman Shades. Top Down Bottom Up is only available in the following collections - Modern Wood, Rustic, Twirl (currently viewing).
Fill your home with the natural beauty and warmth of MOOD Cordless Bamboo Roman Shades. Top Down Bottom Up is only available in the following collections - Modern Wood, Rustic, Twirl (currently viewing).
Measuring the Replacement Cords
Accurate measurements are essential when replacing cords for Roman shades, as even small discrepancies can affect functionality. First, we’ll determine the cord thickness by wrapping the replacement cord around a pencil ten times. Next, we’ll measure the total width of those wrapped loops using a ruler or caliper and divide by ten to find the diameter. Commonly, Roman shades use a 2.2mm diameter cord for peak performance.
To calculate the replacement cord length, we suggest using this formula: cord length = 2.5 × shade width + shade height. Don’t forget to factor in any cord locks or pulleys. By taking accurate measurements, we guarantee the right fit, allowing the shades to function smoothly and efficiently. Additionally, using high-quality materials ensures durability and enhances the overall aesthetic of your Roman shades.
Recommended Products

Fill your home with the natural beauty and warmth of MOOD Cordless Bamboo Roman Shades. Available collections - Modern Wood (currently viewing), Rustic, Twirl, Aloha, Natural Wood.

1.8 Small diameter makes it inconspicuous. Cords are braided to minimize stretch and reduce friction
Polyester fiber - resists effects of sunlight better than nylons and mono-filaments.
Cutting Replacement Cords to Size
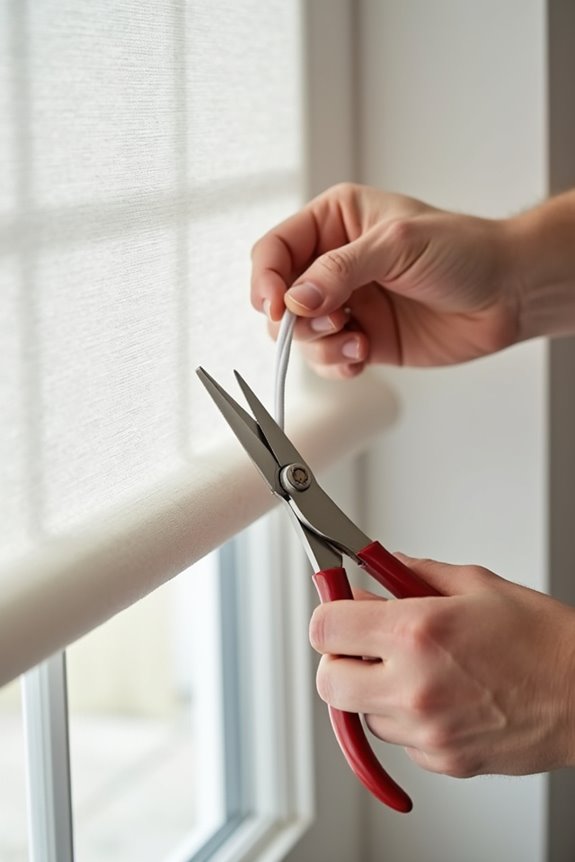
When it comes to preparing replacement cords for Roman shades, careful cutting is essential for maximum performance. First, we need to measure the total cord length based on the size of the shade and the number of lift lines. It’s important to choose cord types made of polyester or nylon for added strength and flexibility. When cutting, make certain to use sharp scissors or a utility knife for a clean cut, and remember to cut each cord individually for easier installation. We should leave an extra length of about 20-30 cm to account for knots and tying. Additionally, light filtering options can help ensure that the Roman shades effectively manage the amount of light entering the room. Finally, we need to confirm our measurements after threading to validate proper adjustments before final cuts.
Recommended Products

Split Back RV Loveseat - The RecPro RV recliner offers pure relaxation with its split loveseat design, allowing independent movement for each seat. Effortlessly recline with a convenient push of a button. Enjoy maximum comfort without disturbing your companion!

DOUBLE GALVANIZED IRON TOP- Features a galvanized iron sheet top that prevents fading and prolongs service life. The roof is double top vented for optimum airflow and comfort during periods of strong wind. The middle of roof has two hooks that can be hung with electric lights or fans to boost your pleasant outdoor time

✅19FT MOTORIZED RETRACTABLE AWNING - YESCAMP 19feet motorized RV awning can be easily opened or closed within one minute with just a push of a button.An emergency hand crank is also included for operating the awning without electricity.
Sealing Cord Ends to Prevent Fraying
Properly sealing the ends of Roman shade cords can greatly extend their lifespan and performance. There are various methods we can use to achieve effective fray prevention.
Heat Sealing
We can use a lighter to briefly melt synthetic fibers, securing the ends. Always take care to avoid burns.
Adhesive Solutions
Applying fabric glue or fray-check liquid to the cut ends offers a flexible, durable seal.
Shrink Tubing
For additional protection, placing heat shrink tubing over the cord and applying heat creates a tight fit.
Knot Techniques
Tying tight knots above the cut ends, followed by wrapping with thread, adds extra security. Additionally, using eco-friendly materials like natural fibers ensures that the cords themselves contribute to sustainability while enhancing durability.
Recommended Products

3/8 inch x 50 Ft Heat Shrink Tubing: Continuous roll gives clean cuts for custom wire, cable, terminal, and splice repairs without wasting pre-cut pieces.

4:1 SHRINK RATIO - Recovers to 1/4 of its original diameter, and makes a tight seal. Eliminates the problem of 3:1 tubing not shrinking tight enough. The perfect black heat shrink roll. Experience our Adhesive Lined heat shrink tubing roll.

3:1 SHRINK RATIO: WORKPRO heat shrink tubing kit with a 3:1 Shrink Ratio, which can shrink to 1/3 of the original diameter, forming a tighter seal and eliminating the problem of 2:1 tubing not shrinking tight enough. The shrinkage temperature is 70° to 125°
Threading New Cords Through the Shade
Threading new cords through a Roman shade is an important step in guaranteeing its proper function and longevity. First, we lay the shade flat, facing down, to easily access the rings and hem pockets. It’s essential to identify the pull side to align the cord placement correctly.
Using appropriate cord types, like upholstery or lift cord, prevents future breakage. We start threading by inserting each cord from the bottom ring upward through the rings, maintaining vertical alignment. Next, we guide the cords through screw eyes or hooks for smooth movement. Double-checking that there are no twists or tangles is critical for ideal operation. Following these threading techniques guarantees our Roman shade functions smoothly and effectively.
Ensuring Proper Alignment of Cords
To guarantee ideal performance of our Roman shades, it’s essential that we align the cords correctly throughout the installation process. Proper cord placement begins with marking bracket positions and configuring all mounting brackets at the same height. This helps avoid any misalignment.
Next, we should verify that the lift cords are straight and parallel. It’s vital to maintain uniform vertical spacing, threading each cord through rings sewn into the shade fabric. We can use alignment techniques such as adjusting the cord tension evenly across all lift lines and confirming that all cords move freely under the headrail. After completing these steps, we’ll want to test the shade’s movement to verify smooth operation without any snagging or jamming.
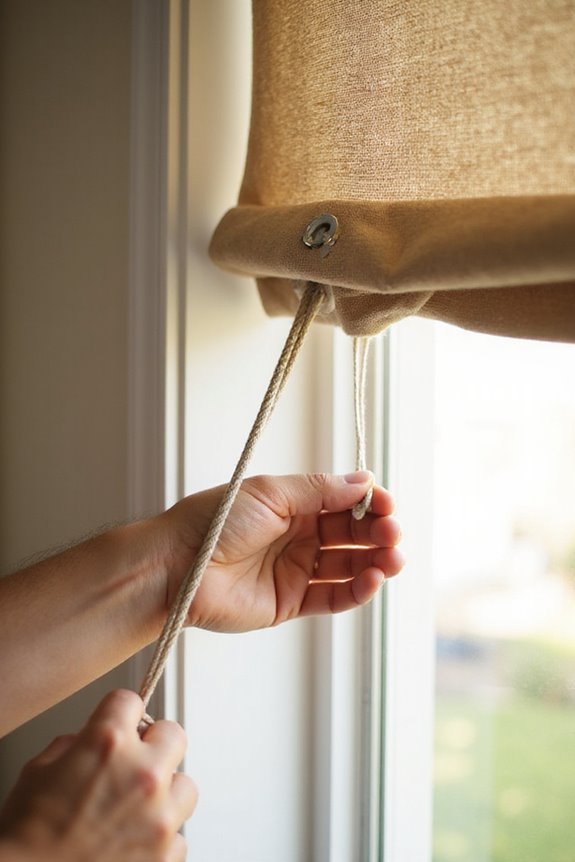
Securing Cords at the Bottom Slats
Securing the cords at the bottom slats is essential for guaranteeing the smooth operation of Roman shades. We can effectively manage cords by using specific installation techniques. First, we should thread the cords through the bottom slats, securing them with knots or crimps to avoid slippage. Applying fabric glue around knots will help prevent fraying.
Using cord locks or condensers can unify multiple cords, improving our cord management system. It’s also vital to leave extra cord length for future adjustments. Regularly inspecting the cords and affirming they’re firmly secured at the bottom slats keeps our shades functioning properly. By following these practices, we ensure our Roman shades operate smoothly and maintain their aesthetic appeal.
Reinstalling the Shade on the Window
After confirming that the cords are secured at the bottom slats, we can proceed with reinstalling the shade on the window. First, we’ll install brackets 3 inches from each end of the window frame and ascertain they are level. For shades under 90 cm wide, use two brackets; for wider shades, install one per 50 cm.
Next, position the headrail on the brackets. We should examine that the draw cords move freely without obstruction. Once aligned, push the headrail into the brackets to secure it.
Finally, test the shade’s operation by raising and lowering it, guaranteeing smooth functionality. We must also check that cords do not block the brackets or interfere with the shade movement, confirming our window treatments are secure and functional.
Connecting Cords to Quick-Release Toggles
Before we attach the cords, it’s important to understand the role of quick-release toggles in securing our Roman shade. These toggles are essential for mounting cords to the pocket tape, guaranteeing our shade operates smoothly.
For toggle installation, we should start by squeezing the toggle’s spring-loaded button to open the center hole. Next, we’ll pass each cord downwards through this hole, pulling any slack below the toggle before releasing the button to secure it. It’s critical to make certain that cords aren’t twisted or overlapping in the toggle.
We’ll repeat this process for all cords, adjusting their height for balance. This setup not only maintains vertical alignment but also allows for easy tension adjustments when needed.
Testing the Operation of the Shade
With the cords securely connected to the quick-release toggles, it’s time to confirm our Roman shade operates smoothly. First, let’s pull the lift cord gently to raise the shade, then release it to lower. We should check for any hesitation or resistance during this shade movement.
Next, testing the locking mechanism is essential; we pull the cord at various angles to see if it holds securely. Observing the performance, we note whether the cords rewind neatly without slack.
We need to verify cords move freely through the pulleys and rings, and if we find any visible tangles or fraying, we’ll identify potential cord issues that could disrupt function, requiring further attention.
Adjusting Cord Tension for Optimal Performance
Proper cord tension is essential for guaranteeing that our Roman shades operate effectively and safely. To achieve the correct tension calibration, we need to closely monitor the spring adjustment mechanisms.
- Increasing Tension: Turn the tension adjuster clockwise to tighten. Guarantee we don’t over-tighten, as it can damage the shade.
- Decreasing Tension: When reducing tension or correcting the stopping position, turn the adjuster counterclockwise in small increments. Test the shade’s movement after each adjustment.
- Regular Checks: We should regularly inspect and readjust to guarantee the shade moves smoothly without slack, which can create safety risks and mechanical failures.
Frequently Asked Questions
How Often Should I Replace the Cords in My Roman Shades?
We recommend replacing the cords in our Roman shades every 3 to 5 years for best cord lifespan. If we notice any damage or wear, it’s best to replace them sooner to guarantee safety and functionality.
Can I Use Any Type of Cord for My Roman Shades?
While we might think any cord will work, using specific cord materials guarantees durability and safety. For instance, 1.8 mm cords lift approximately 155 lbs—key for effective shade replacements and smooth operation. Let’s prioritize quality!
What Should I Do if the Shade Won’T Lower After Repair?
If our shade won’t lower after repair, we should troubleshoot by checking cord locks and adjustments, ensuring everything’s properly threaded. Let’s test for jams and consider professional help if issues persist.
Are There Safety Measures for Children With Roman Shade Cords?
Yes, there are important safety measures for protecting children from roman shade cords. We can choose cord alternatives like cordless or motorized options, install cord anchors, and guarantee blinds comply with child safety regulations for peace of mind.
How Can I Maintain My Roman Shades for Longevity?
To maintain our Roman shades for longevity, let’s use effective cleaning tips and proper fabric care. Regular dusting, spot cleaning, and careful handling will help preserve their beauty and functionality for years to come.